SDF Building and Deploying Customization Using WebStorm (PART 3)

Home » Blog » Customization & Integration » SDF Building and Deploying Customization Using WebStorm (PART 3)
 alphabold

We are back with another part of our SDF building and deploying customizations using the WebStorm series! If you have not read the two previous parts, here is a quick recap for you:
Read SDF Building and Deploying Customization using WebStorm (PART 1), we discussed how to set up WebStorm on your machine and how to connect NetSuite with WebStorm for NetSuite customization.
Read SDF Building and Deploying Customization using WebStorm (Part 2), we discussed how to create the first project in WebStorm and deploy it to the NetSuite account.
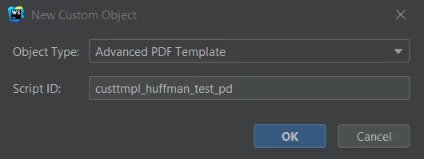
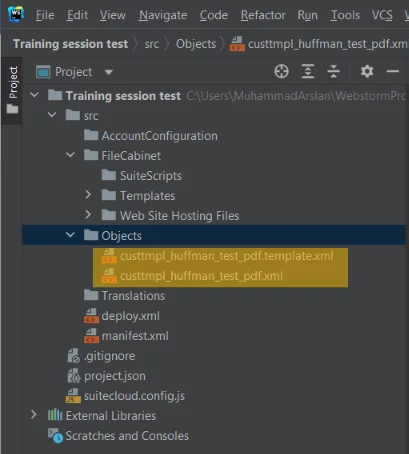
This blog will discuss how to create a new Advanced PDF Template in WebStorm and deploy it in your NetSuite account through SDF building.
Let’s explore these processes without any further ado.
Are you ready to leverage the SuiteCloud Development Framework for streamlined NetSuite customization and deployment? AlphaBOLD's team of experts is here to guide you through every step, ensuring your NetSuite environment is optimized for your business needs.
Request a Demo


Before deploying the PDF Template to your Production or sandbox environment, be sure to complete the following steps:
Now we are going to validate and deploy our project in NetSuite
In this step, we double check to make sure there is no error in the project or in PDF.
This is implemented by using the “Deploy” or the “Deploy to Account”
Please note that Deploy and Deploy to Account are not the same thing. Let’s learn more about the differences between these two methods.

Streamline your ERP selection process with our comprehensive checklist, ensuring you make informed decisions for your business's future success.
Download Guide
When we use the “Deploy to Account” command, we can choose any account for the project’s deployment. In part 1 of this blog series, we discussed that we could connect as many NetSuite accounts as we want, but we would recommend using only limited ones so that you are not confused while deploying.
So Right-click > NetSuite > Deploy to Account, select where you want to deploy > click OK > WARNING COMES > click OK.
Go to NetSuite and double-check whether this PDF is there or not.

Discover the power of customizing NetSuite through the SuiteCloud Development Framework with AlphaBOLD. Reach out to us to learn more about our SDF services and how we can help you achieve operational excellence.
Request a DemoIn this blog, we have learned how to create an advanced PDF Template in WebStorm SDF building and deploy it into NetSuite. In the upcoming blogs, we will look into many other features of WebStorm, so stay tuned for more. Meanwhile feel free to drop share your thoughts in the comment box below!


