SDF Building and Deploying Customization using WebStorm (Part 2)

In Part 1, we discussed how to download WebStorm and connect with NetSuite. In this blog, we will discuss: 

  • How to create first project in WebStorm and deploy it in your NetSuite account 
  • How to create custom record in WebStorm and deploy it to NetSuite 
  • How to import custom objects from NetSuite into WebStorm for customization 
  • How to import script files or bundles from NetSuite into WebStorm for customization 

Let’s explore these processes without any further ado. 

Create the first project in WebStorm and deploy it to NetSuite Account 

Follow these steps to create your project: 

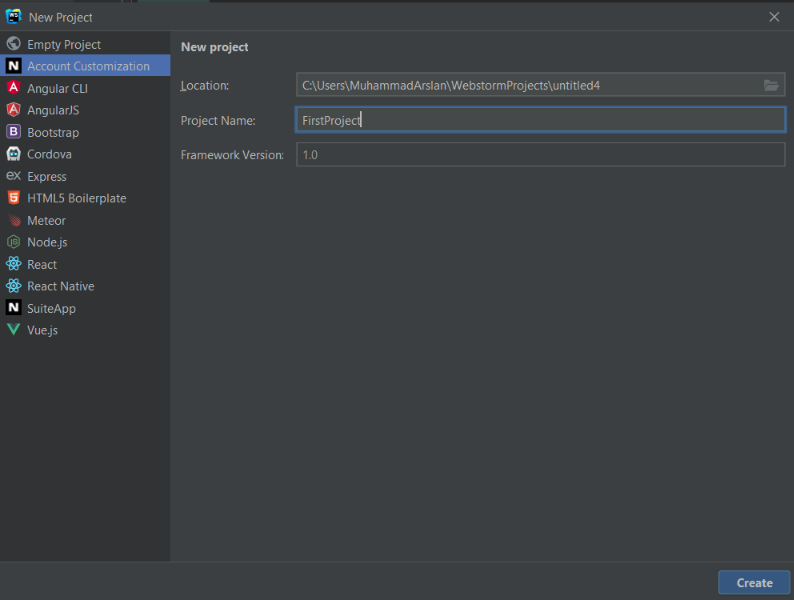
Go to File > New > Project > Account Customization > Enter the name of your project > click Create 

steps to create your project

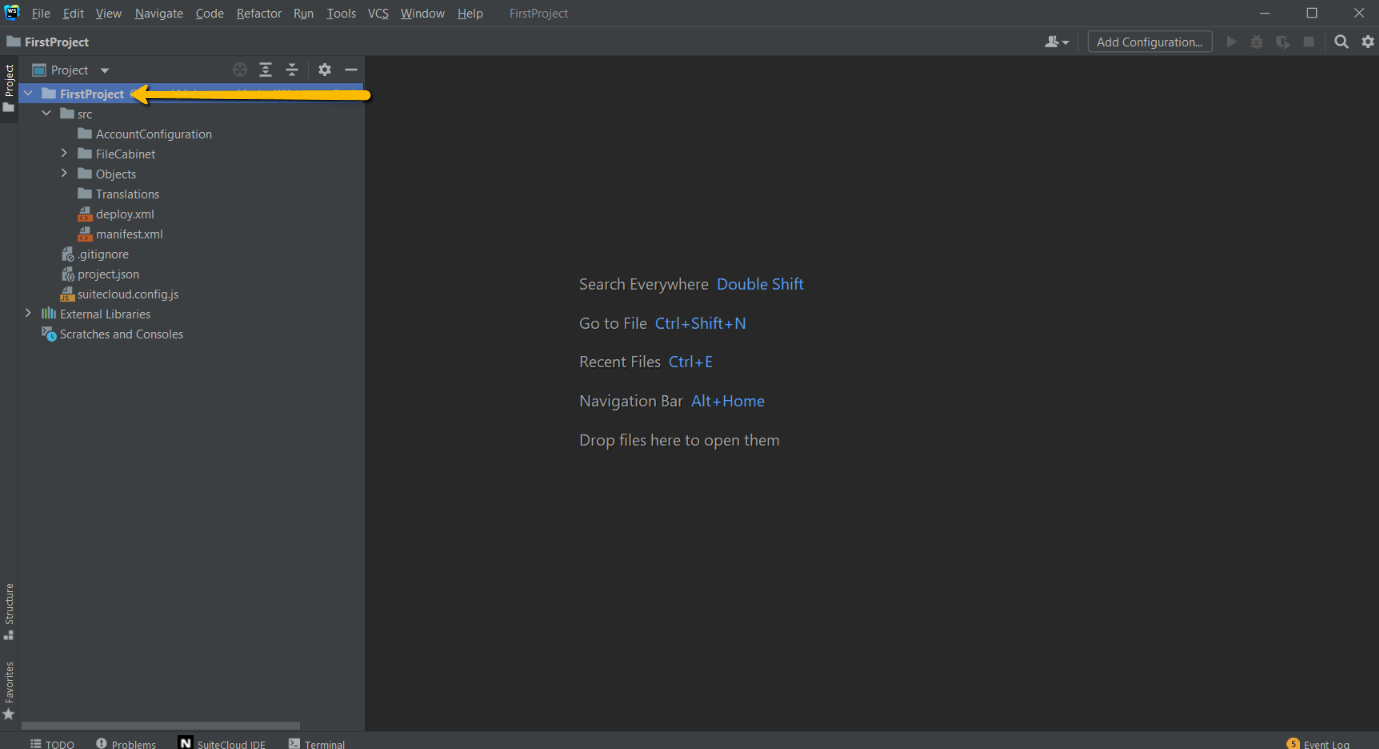
When you create your first project, it looks like this: 

first project

Create Custom Record in WebStorm and Deploy it to NetSuite 

Here are steps to follow: 

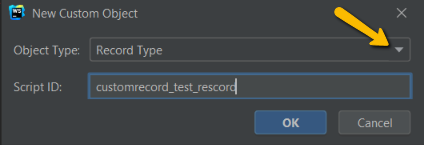
  1. Right click on Object > New > Custom Object > Select Record Type from Drop Down list and give ID like: 

Custom Object

2. Next, click ‘OK.’ 

Now your Record is created, and a new tab opens for customization.  

Here are some important tips and things to do during customization: 

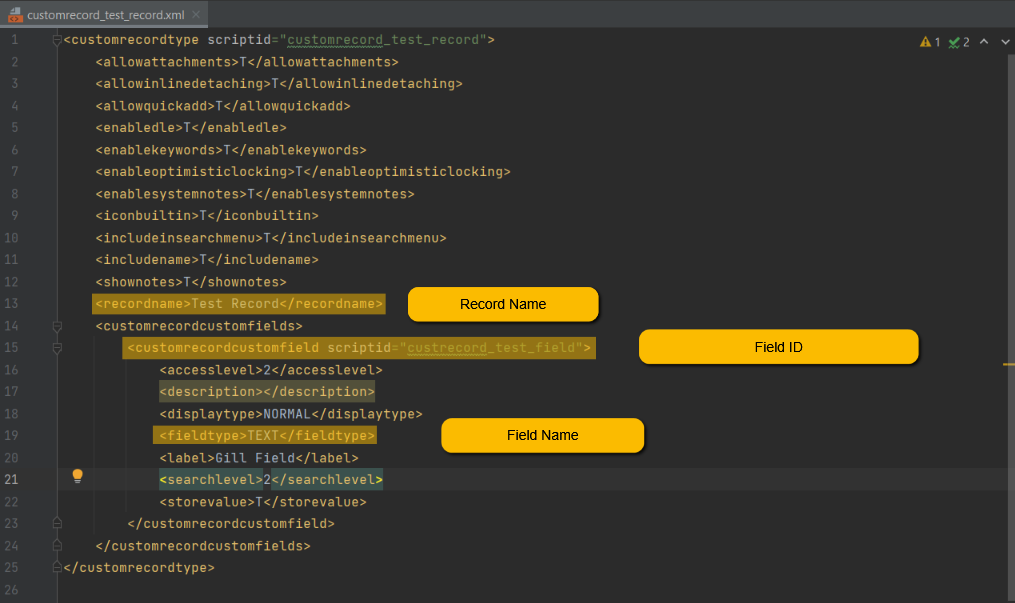
  • Record Name like Test Record. 
  • You can add fields in your record as well after giving ID and Name like as follow: 

Record Name like Test Record

  • You can add more fields as per your requirements, copy and paste and change the name and ID of your field. 

<customrecordcustomfield scriptid=”custrecord_test_field”> 

            <accesslevel>2</accesslevel> 

            <description></description> 

            <displaytype>NORMAL</displaytype> 

            <fieldtype>TEXT</fieldtype> 

            <label>Gill Field</label> 

            <searchlevel>2</searchlevel> 

            <storevalue>T</storevalue> 

        </customrecordcustomfield> 

  •  You should remember one important thing before deploying your record, i.e., add all the record reference and data  to your manifest.xml file following steps below: 
  1. Right click > NetSuite > Add dependency References to Manifest.s 
  2. This will automatically add references to your manifest file. 
  3. Also, give a name to your manifest file because when you deploy it that Project name appears in your account like: 

Add dependency References to Manifest

Now you can deploy it to your Production account. It is just a small project to confirm whether our data has been pushed into NetSuite using WebStorm or not. 

Deploy your first project from WebStorm to NetSuite 

 Follow the process below to deploy your first project: 

  1. Right Click > NetSuite > Validate Project Against Account  

These steps help you to:  

Validate your account  

 To find if there is any error in your manifest file, like record, list, workflows issues, etc. 

  1. Figure out in which account you want to deploy your project because you might have more than one account attached to WebStorm.  
  2. Next, Right Click > NetSuite > Deploy 
  3. A Confirmation pop up will appear, click ‘YES.’ 

You will receive a confirmation message in the end. 

How to confirm record creation in the NetSuite Account? 

Follow these steps to confirm whether your account is created in the NetSuite account or not: 

Go to Customization tab > SuiteCloud Development > deployment Audit Trail 

  • Here, you can see the name of your manifest file,  like: 

deployment Audit Trail 

 It confirms you have successfully created and deployed the project.  

 Next, confirm that the Record you created in WebStorm is created in NetSuite as well. Please refer to the following steps below: 

  1. First, go to Customization tab > List, Records, & Fields > Record Types. 
  2. Next, go to filters > owner > select your username. 

Here you see your record – CONGRATULATIONS! 

Record Types

3. To view your custom record, click on it. 

custom record

Your custom record looks like the one you created in NetSuite using UI. 

Import custom object from NetSuite into WebStorm for customization 

Here is what to do to import custom objects from NetSuite into WebStorm for customization: 

  1. Right Click on Object > NetSuite > Imports Objects from Account… 
  2. Select your production account where you want to import objects, then click ‘Next.’ 
  3. Then, select object type that you want to import and click on ‘Search.’ 
  4.  Again, click below Search to find which custom object you want to import from NetSuite. 

It can also show your custom record you created before, like: 

custom record you created before

5. Select Record that you want to import, and then, click ‘Finish.’ 

6. Finally, your Custom Record is successfully imported into WebStorm, like: 

Finish | WebStorm

Import script file or bundle from NetSuite into WebStorm for customization 

 Follow these steps to import script file or bundle: 

  1. Right Click on SuiteScripts > NetSuite > Imports files From Account. 
  2. Select Production account where you want to import files. 
  3. Click on ‘Get Files.’ 
  4. Select all files  you want to import from NetSuite or check SuiteScripts (for all files). 
  5. Lastly, click ‘OK.’ 

Get Files | WebStorm

You can see your files under SuiteScripts tab, like: 

SuiteScripts tab | WebStorm

After customization, you can deploy it to your NetSuite Account following this navigation: Right click > NetSuite > Deploy. 

Conclusion: 

In this blog, we learnt how to create our first project using WebStorm and deploy it to connected NetSuite Account. You can also create custom records, import records and scripts from NetSuite and do a lot more. Let’s discuss other aspects of WebStorm in another blog. 

Let us know in the comments below how this blog helped you.Â