Introduction
This blog is the second part of the SCA Extensions series. Previously, I discussed the Suite Commerce advanced extension features, their importance, and how to use publicly available extensions on your site.
I’ll walk you through the custom development environment in this part of the Suite Commerce Advanced extension series.
If you are not familiar with custom extension development, then you can go through the first part of this blog here: Advanced (SCA) Extensions.
What are SuiteCommerce Extensions?
NetSuite Suite Commerce Advanced extensions are the feature of NetSuite SCA (Suite Commerce Advanced) where users can update/extend website’s components’ look and feel without altering core modules and stylesheets on the website. Users can install pre-built or open-source extensions through the Install bundle Wizard.
However, every user has a different set of requirements that often don’t align with publicly available extensions; hence, SuiteCommerce Advanced (SCA) offers the flexibility of custom extension development.
For example, users can create custom module and link with custom records, show list or search data in the frontend. You can also add custom events on PDP (Product detail page) or PLP (Product list Page) or Checkout pages etc.
Client shoutout for NetSuite SuiteCommerce Advanced:
“Our ecommerce site has a modern feel and we’re able to customize it more. The customer experience has greatly improved, and we’ve begun to see an increase in online sales. We are continuing to enhance SuiteCommerce Advanced to take full advantage of its robust functionality.”
Casey Rotach – Ecommerce Manager, Cornell Retail Services
Prerequisite To Develop an Extension for SuiteCommerce:
Additionally, enable feature “TOKEN-BASED AUTHENTICATION” and assign “SCDEPLOYER” role to a NetSuite user that we are going to use.
- Users can access this feature by the following navigation: Home > Setup > Company > Enable Features > SuiteCloud (Subtab) > Manage Authentication (Section) > TOKEN-BASED AUTHENTICATION
Click on the checkbox for the” TOKEN-BASED AUTHENTICATION “option and save settings.
- To assign a SCDEPLOYER role to a user, adhere to the following steps:
- Login into NetSuite Instance.
- Go to the employee record that the user wants to use to build an extension.
- Edit Employee record.
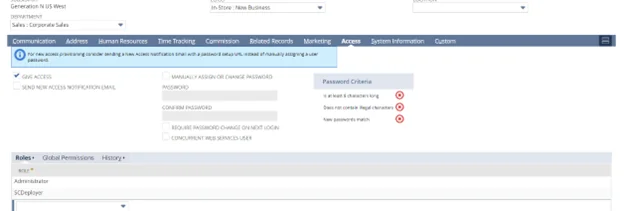
- Add the SCDeployer role line into the roles list under the access subtab and save the record. See the image below:
The prerequisite steps to set an environment for custom extension development in SCA are the same as explained in What are SuitteCommerce Advanced (SCA) Extensions? (Part 1)
Is Navigating NetSuite Becoming Notorious?
Overcome the challenges of navigating NetSuite complexities with ease. Our expert team can guide you through the intricacies of NetSuite customization and optimization. Simplify your NetSuite journey
Request a ConsultationSetup Development Environment for SuiteCommerce Extension
- To set up the development environment, follow the steps in the same order: Download “ExtensionDevelopmentTools-22.1.0.zip.”
- Users can download this tool by the following navigation
Home > Documents > Files > File Cabinet > SuiteBundles > Bundle 426586 (this will depend on SuiteCommerce Extension Management version) > ExtensionDevelopmentTools-22.1.0.zip > Download

- Unzip “ExtensionDevelopmentTools-22.1.0.zip” in a new folder.

- Open the folder in the file editor, i.e., Visual Studio Code.
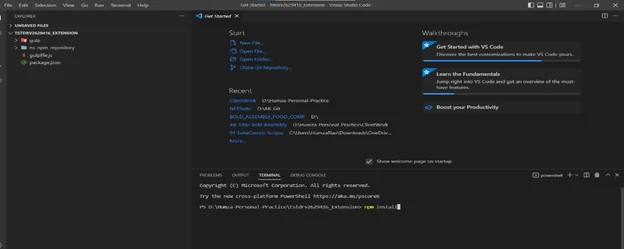
- Install the node package in a terminal through the “npm install” Command.
- Install node packages using the “npm install” command in a terminal; see the image below for reference.
Fetch SuiteCommerce Extension:
- Before creating an extension, you must fetch the relevant extension first. It includes all current active extensions and the theme.
- User can fetch extension by using this command “gulp extension:fetch”.
- first time, a user initially needs to create a new token. Token will be generated only if the SCDeployer role is assigned to the current user.


Create SuiteCommerce Extension:
After completing the fetching process, you can create a new extension using the command “gulp extension: create”. A new dummy executable extension will be created after adding all the required information. All the needed information fields are represented in the following snapshot.

Execute Locally:
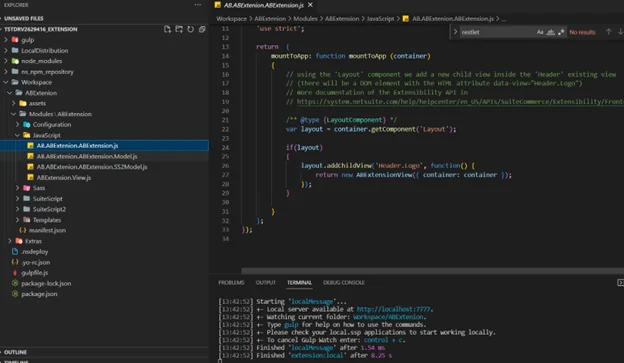
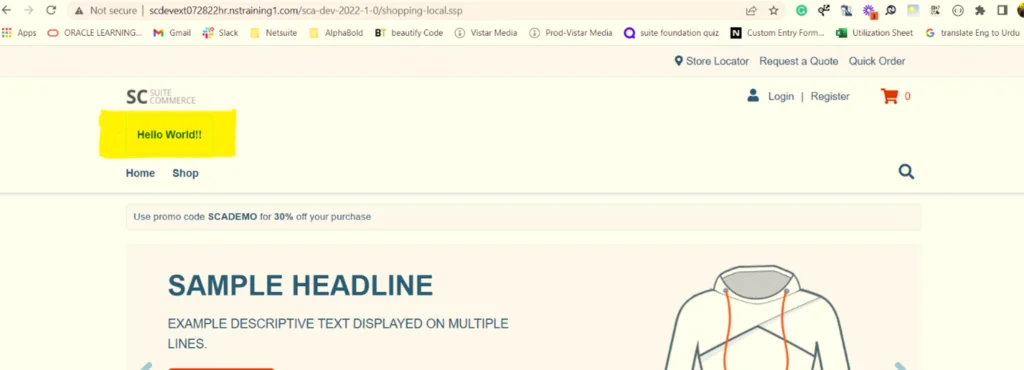
After creating the extension user can run this locally to review the changes before deployment by using the command “gulp extension: local”. As displayed in the below screenshot, the hello world child division is added under the header section.
Deploy Extension:
After reviewing changes in the local environment, extension will be ready for deployment and can deployed with command “gulp extension: deploy”.
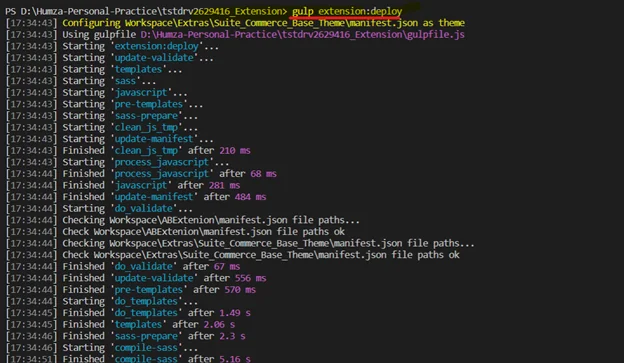
Activate Extension:
After the deployment process, the user must activate the extension to see the results on the live website. Users can activate the extension by: Open Extension management by following the navigation.
Home > Commerce > Extensions > Extension Manager > Edit “your website domain record” > Extensions(subtab) > Active Value Check True “against your extension name”and save.
Users can review their changes on the live site after the activation process.

ERP Selection Checklist
Streamline your ERP selection process with our comprehensive checklist, ensuring you make informed decisions for your business's future success.
Learn more
NetSuite Advanced Field Help Extension
NetSuite offers various extensions and customizations to enhance its functionality, including the “Advanced Field Help” extension. This extension improves user experience by providing comprehensive guidance and support directly within NetSuite fields. Here’s how the NetSuite Advanced Field Help extension can benefit your organization:
1. Enhanced User Training:
The extension allows you to provide detailed instructions, examples, and context-specific help for specific fields. This can significantly reduce the learning curve for new users and enhance their understanding of data entry requirements.
2. Reduced Errors:
By offering real-time assistance and clear explanations within fields, users are less likely to make data entry mistakes. This can improve data accuracy and reduce the need for data cleanup or corrections.
3. Consistency in Data Entry:
You can ensure that all users follow standardized data entry practices by providing guidance on field-specific conventions and requirements. This consistency can lead to better data quality and reporting accuracy.
4. Quick Access to Information:
Users can access help and guidance without leaving the page they are working on, streamlining their workflow and reducing the need to search for information in external documents or manuals.
5. Customization Options:
The NetSuite Advanced Field Help extension is customizable, allowing you to tailor the guidance to your organization’s specific needs and field requirements.
6. Better User Adoption:
Improved user experience through the extension can lead to better user adoption rates, as employees are more likely to embrace software that offers in-context help and support.
7. Time and Cost Savings:
Reducing data entry errors and the need for extensive training can save costs and increase operational efficiency over time.
To implement the NetSuite Advanced Field Help extension effectively, consider working with NetSuite-certified developers or consultants who can customize the extension to meet your organization’s precise requirements. This extension can be a valuable addition to your NetSuite environment, enhancing user productivity and data accuracy.
Ready to Take your Customization to the Next Level?
Elevate your SuiteCommerce Advanced customization with our advanced extensions. Unlock new possibilities and enhance your online store's functionality.
Request a ConsultationConclusion
I hope this guide helps you easily set up a custom development environment in SCA. Just follow every step in the same order as explained above. However, if you are an average user, you can always seek help from NetSuite partners like ALphaBOLD.
In our upcoming blogs, we will discuss the architecture of extensions and how to execute code between different layers in Suite Commerce Advanced Extensions. Do you have some suggestions or want to share your thoughts? Comment below. Let’s grow together!


